olympus om 10 manual
The Olympus OM-10 manual is essential for mastering this iconic camera, detailing its functions, manual adapter use, and maintenance for optimal photography experiences․
1․1 Overview of the Olympus OM-10 Camera
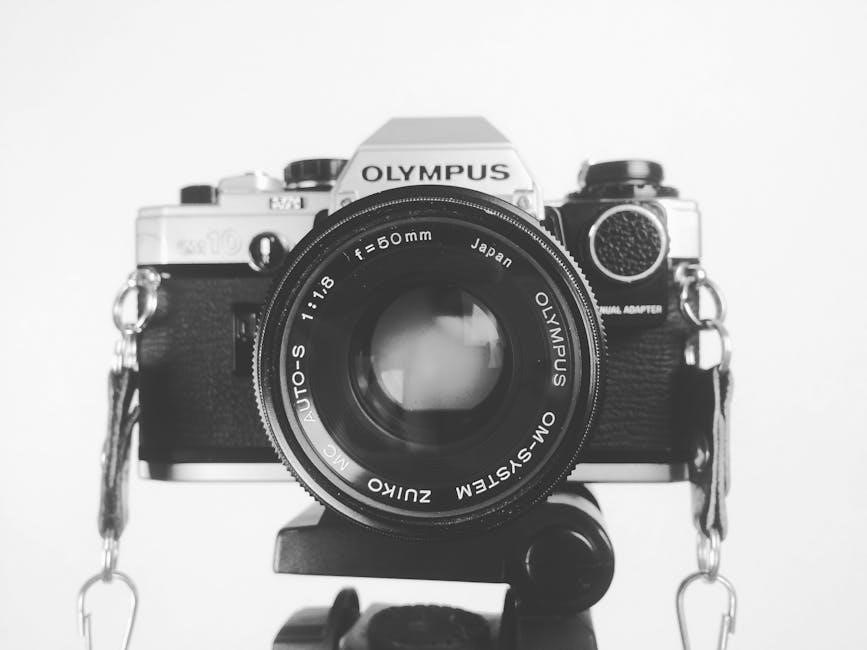
The Olympus OM-10 is a compact, user-friendly 35mm SLR film camera designed for both beginners and enthusiasts․ It features a built-in light meter and manual adapter for enhanced control․ Known for its durability and portability, the OM-10 supports a wide range of Olympus OM-mount lenses․ Its intuitive design makes it accessible while maintaining professional-grade functionality, making it a popular choice for film photography․ The camera’s manual adapter allows for precise adjustments, though it requires manual synchronization with shutter speeds for optimal results․
1․2 Importance of the Manual for Optimal Camera Use
The manual is crucial for unlocking the Olympus OM-10’s full potential, providing detailed instructions for operating its features, troubleshooting issues, and maintaining the camera․ It explains the manual adapter’s functionality, exposure control, and film handling, ensuring users can achieve precise results․ Regular maintenance tips, like cleaning and battery care, are also covered, helping to extend the camera’s lifespan and performance․ Referencing the manual ensures users can resolve common errors and adapt to various shooting conditions effectively․
Key Features of the Olympus OM-10
The Olympus OM-10 features a compact SLR design, aperture priority mode, manual adapter compatibility, and a clear viewfinder for precise focusing and exposure control․
2․1 Design and Build Quality
The Olympus OM-10 features a lightweight and durable design, with a compact SLR body made from high-quality materials․ Its ergonomic layout ensures comfortable handling, while the sturdy construction provides reliability for long-term use․ The camera’s build emphasizes functionality, with intuitive controls and a clear viewfinder, making it a robust tool for photographers seeking both performance and portability․
2․2 Main Functions and Controls
The Olympus OM-10 offers intuitive controls, including a mode dial for selecting auto or manual modes, a shutter speed dial, and an aperture ring on compatible lenses․ The manual adapter enables precise control over exposure settings, while the viewfinder provides clear visibility of framing and focusing․ Additional features like the ASA/ISO setting and film advance lever ensure a seamless shooting experience, catering to both beginners and experienced photographers alike․

Understanding the Manual Adapter
The manual adapter enhances control over the Olympus OM-10, allowing precise adjustments to shutter speed and aperture for tailored exposures, optimizing creative photography outcomes effectively always․
3․1 What is the Manual Adapter?
The Manual Adapter is an essential accessory for the Olympus OM-10, enabling photographers to gain manual control over shutter speed settings independently of the camera’s automatic functions․ It allows for precise adjustments, providing greater creative control over exposures․ The adapter does not synchronize automatically with the camera’s viewfinder shutter speed display, requiring manual adjustment to match desired settings․ This feature is particularly useful for photographers seeking more hands-on control over their shots, ensuring accurate exposures tailored to specific lighting conditions․ Understanding its operation is crucial for maximizing its potential in various photographic scenarios, making it a valuable tool for both beginners and experienced photographers alike․ By using the Manual Adapter, photographers can achieve more consistent and desired results, enhancing the overall quality of their images․ Proper use of the Manual Adapter requires a good understanding of manual photography techniques and the camera’s functional capabilities, ensuring that each shot is captured with the intended artistic vision․
3․2 How to Use the Manual Adapter Effectively
To use the Manual Adapter effectively, start by understanding its role in overriding automatic settings․ Set the ISO on the camera and adapter to match your film speed․ Use the built-in light meter to gauge exposure, then adjust the adapter’s shutter speed manually․ Test your settings with a trial shot, reviewing results to refine adjustments․ Regular practice ensures mastery, allowing precise control over exposures for consistent, high-quality images․
Shooting Modes and Settings
The Olympus OM-10 offers Auto Mode for ease of use and Manual Mode for precise control․ Adjust settings like shutter speed, aperture, and ISO to suit lighting conditions․
4․1 Auto Mode vs․ Manual Mode
The Olympus OM-10 offers two primary shooting modes: Auto Mode and Manual Mode․ Auto Mode simplifies photography by automatically adjusting settings, ideal for beginners․ Manual Mode provides full control over aperture, shutter speed, and ISO, allowing experienced photographers to achieve precise creative results․ Understanding both modes is crucial for optimizing the camera’s potential in various lighting conditions and artistic scenarios․
4․2 Adjusting Shutter Speed and Aperture
Adjusting shutter speed and aperture on the Olympus OM-10 requires manual control when using the Manual Adapter․ Shutter speed is set separately from the camera’s viewfinder indication, ensuring precise exposure․ Aperture is controlled via the lens, working in tandem with shutter speed to achieve desired effects․ Slower speeds can introduce motion blur, while faster speeds freeze action․ Proper balancing of these settings is essential for optimal results in various lighting conditions and creative photography scenarios․
Loading and Using Film
Properly loading and using film in the Olympus OM-10 ensures optimal image quality․ The manual provides clear guidance on handling film and setting the correct ISO for precise exposures․
5․1 Step-by-Step Film Loading Guide
- Open the camera back by sliding the release latch downward․
- Align the film cartridge with the chamber, ensuring the tape is facing outward․
- Gently push the cartridge into the chamber until it clicks․
- Feed the film leader into the take-up spool, ensuring proper alignment․
- Close the camera back and advance the film to the first frame․
- Set the ISO on the lens to match the film speed for accurate exposures․
5․2 Film Speed and ISO Settings
Film speed, measured in ISO, determines sensitivity to light․ The Olympus OM-10 supports ISO 100-400 for 35mm film․ Always set the ISO on the lens to match the film speed for accurate exposures․ Lower ISOs (e․g․, 100) are ideal for bright conditions, while higher ISOs (e․g․, 400) suit low-light situations․ Mismatched settings can result in under or overexposed images․ Adjust the ISO dial on the lens to ensure proper alignment with your film’s specifications for optimal results․

The Viewfinder and Focusing
The Olympus OM-10’s viewfinder provides a clear, uncluttered view for precise composition․ Use the focusing ring or microprism/split-image screen for sharp focus, ensuring tack-sharp images every time․
6․1 Understanding the Viewfinder Display
The Olympus OM-10’s viewfinder displays essential shooting information, including the suggested shutter speed, aperture, and battery status․ The viewfinder shows the camera’s recommended settings, aiding composition and exposure decisions․ However, it does not automatically synchronize with the manual adapter’s settings․ Users must manually adjust the adapter to match the desired shutter speed, ensuring accurate exposure control․ This feature requires attention to detail for optimal results in various lighting conditions․
6․2 Focusing Techniques for Sharp Images
For sharp images with the Olympus OM-10, use the split-image microprism in the viewfinder to align subjects precisely․ The center-weighted metering ensures accurate focus on your main subject․ When using the manual adapter, focus carefully by rotating the lens ring, ensuring the split-image aligns for clarity․ This technique works best with the 50mm f/1․8 lens, providing precise control for professional-quality results in various lighting and composition scenarios․
Exposure Control and Metering
The Olympus OM-10 features a built-in light meter for precise exposure control․ It adapts to various lighting conditions, ensuring balanced results when manually adjusting aperture and shutter speed․
7․1 Built-in Light Meter and Its Functions
The Olympus OM-10 is equipped with a built-in light meter, essential for accurate exposure control․ It measures light intensity through the lens, providing precise aperture and shutter speed readings․ The meter supports both manual and automatic modes, ensuring balanced exposures․ Its functionality is crucial for understanding how light interacts with the camera, enabling photographers to make informed adjustments for optimal results in various lighting conditions․
7․2 Adjusting Exposure for Different Lighting Conditions
Adjusting exposure on the Olympus OM-10 involves balancing aperture, shutter speed, and film ISO․ In bright light, use faster shutter speeds or smaller apertures to prevent overexposure․ In low light, slower speeds or larger apertures are needed․ The manual adapter allows manual override of the camera’s suggested settings, ensuring creative control․ For complex lighting, external meters or bracketing techniques can refine results, enhancing image quality across various scenarios․
Maintenance and Care
Regular cleaning with a soft cloth, avoiding harsh chemicals, and checking for dust and dirt are essential for maintaining the Olympus OM-10’s functionality and longevity․
8․1 Cleaning the Camera and Lens
Use a soft, dry cloth to gently wipe the camera body and lens, avoiding harsh chemicals․ For stubborn marks, lightly dampen the cloth with distilled water․ Never apply cleaning solutions directly to the lens․ Regularly inspect and clean the viewfinder and mirror to ensure optimal visibility․ For detailed cleaning, a microfiber cloth and a cotton swab can be used on delicate areas․ Always handle the camera with care to prevent scratches and maintain its functionality․
8․2 Battery Maintenance and Replacement
Use a 6V silver-oxide battery for the Olympus OM-10․ Avoid mixing old and new batteries to prevent damage․ Clean terminals with a soft cloth to ensure proper contact․ Replace batteries when the viewfinder meter dims or exposures become inconsistent․ Store unused batteries in a cool, dry place․ Never use damaged or leaking batteries, as they can corrode internal components․ Refer to the manual for detailed replacement instructions to maintain optimal camera performance․
Troubleshooting Common Issues
Address common issues like shutter synchronization errors and manual adapter malfunctions by consulting the manual for diagnostic steps and solutions to ensure smooth camera operation․
9․1 Resolving Shutter Speed Synchronization Problems
Shutter speed synchronization issues with the manual adapter can be resolved by ensuring the adapter is set to the desired speed, not the viewfinder’s suggested speed․ This requires adjusting the adapter manually to match the intended exposure settings․ Regular maintenance and cleaning of the shutter mechanism can prevent such problems․ Always refer to the Olympus OM-10 manual for detailed troubleshooting steps and solutions to maintain optimal camera performance and avoid synchronization errors during photography sessions․
9․2 Fixing Common Errors with the Manual Adapter
Common errors with the manual adapter often arise from synchronization issues; Ensure the adapter is set to the correct shutter speed, as it doesn’t automatically sync with the viewfinder․ Check that the adapter is clean and free of dirt, which can cause improper connections․ If exposure issues persist, manually adjust the aperture or film speed to compensate․ Refer to the Olympus OM-10 manual for detailed troubleshooting steps to resolve adapter-related problems effectively․
Mastery of the Olympus OM-10 requires practice and understanding its manual adapter; Explore its features, maintain it well, and enjoy the art of film photography with precision․
10․1 Summary of Key Takeaways
Mastering the Olympus OM-10 requires understanding its manual adapter, loading film correctly, adjusting exposure settings, and regular maintenance․ Troubleshooting common issues ensures optimal performance․ Practice and experimentation with shooting modes will enhance your photography skills․ The OM-10’s design and functionality make it a timeless tool for film enthusiasts, offering a blend of automation and manual control for creative expression․
10․2 Encouragement to Explore Further
Exploring the Olympus OM-10 further will deepen your appreciation for film photography․ Experiment with its manual adapter and creative shooting modes to unlock new possibilities․ As you master its functions, you’ll discover the joy of working with a timeless camera․ Don’t hesitate to practice and experiment—every roll of film tells a story․ Embrace the process, and let the OM-10 inspire your photographic journey․